December 16, 2006

Kitchen Selections

We worked with a "kitchen designer" at Home Depot Expo. This wasn't a very good experience (I'll just call her "C"), but here are the cabinet designs she came up with:A lot of people had a hard time envisioning what we wanted to do between the kitchen and dining room where the closet used to be and where the stairs go to the basement, including C, but she did end up coming up with a good solution, and the upper corner cabinet was her idea.

Since we picked out a granite counter top we were able to get an undermount sink - very cool.

We had a really hard time deciding between these three light fixtures for over the booth. We ended up choosing the one on the far left from Pottery Barn.

We also had a really hard time choosing tile for the backsplash, but I'm so glad we took our time with this decision. We ended up choosing a simple square bisque tile for the majority of the backsplash and this border tile:
We knew we definitely wanted hardwood floors in the kitchen, but choosing the exact flooring was a little tricky. This is the original wood flooring that we have in the rest of the downstairs:
We ended up choosing this pre-finished cherry flooring from Home Depot Expo that's a pretty close match. And if we ever end up replacing the rest of the flooring downstairs, we'll use this.
I was so happy to replace another one of those huge, ugly heating registers, this time with a flush mount grille from Reggio Registers. It came unfinished so we were able to stain it to match the new floor perfectly.

December 15, 2006

Kitchen - Before Pictures

This is pretty much how the kitchen looked when we bought our house in 2000 except the walls were originally a weird peachy color. Again, I'm embarrassed to say that I picked out this wallpaper, but at the time it seemed like the best way to compliment the awful cabinet color. The only other option was to paint the cabinets. In hindsight that's probably what we should have done, but you live and you learn.

So when you walk into the kitchen, this is what you see to the right:
Straight ahead:
Another idea we had when we first moved in was to open up the closet on the left (which is where the stairs go to the basement) so you could see into the dining room. When we had the dumpster here for the downstairs bathroom remodel, we had them go ahead and open up the walls and patch up the drywall. So it looked like this for quite a while. We called it "the throne".This is the view looking back into the living room. Another idea we thought about over the years was removing this closet so we could have an eat-in kitchen.
So we also had the bathroom guys remove the closet walls. Unfortunately that left the tile torn up, so we couldn't even put a table and chairs here while we were waiting to remodel the kitchen.

October 25, 2006

Upstairs Bathroom

In October of 2006 we found out we'd be having company stay with us for Thanksgiving. We'd been thinking about remodeling the upstairs bathroom, so this seemed like a good time to go ahead and do it. Compared to the exterior remodeling (2 months) and the downstairs bathroom (2 weeks), this was a pretty quick project (4 days).

Here's a before and after photo. Again, this bathroom is so small, it's really hard to get any good pictures.
As you can see the biggest improvement was the shower door. We replaced the old door with a beautiful, clear, frameless door. We also replaced the shower surround with a base and tiled walls, and replaced the floor tile and baseboard while we were at it.

Even though I wasn't crazy about the tile we ended up using for the downstairs bathroom, we decided to use something similar in the upstairs bathroom to keep them consistent with each other.

Again, we kept the existing toilet and vanity to save some money, we just replaced the cabinet hinges and put new caulking around the vanity top.

May 26, 2006

Downstairs Bathroom

When we remodeled the exterior of our house we asked the siding guys to remove the downstairs bathroom window which was in the shower area. At the time we thought we would eventually re-tile that area ourselves. Two years passed, and that never happened, so we called our contractor and asked him for an estimate.

He came over to take a look at the bathroom, and as we were talking about it, we decided to have him remove the old cast iron bathtub as well. And as long as we were doing that, we might as well also re-tile the floor. And install a recessed medicine cabinet. And a fan. And update the electrical. And replace the baseboard and heating vent.

It's really hard to take good pictures of this tiny bathroom, so here's a drawing to give you an overall idea of the layout:
Now for the "before" pictures. I really hate to admit this, but we actually put up this wallpaper and border (!) ourselves in 2000.
I hated this heating register!
And this white tile floor:
Here's a picture of where the window used to be. Oh yeah, and notice there wasn't a real shower head, just a hose going from the bathtub faucet up to a handheld shower head. Lovely.
After removing the old tile and the bathtub, they ended up taking down almost all of the walls to the studs.
Then they put in lots of insulation on the exterior wall where the bathtub is so our bathwater won't get cold so quickly in the winter.
Once the bathtub was in and the new drywall was installed, they started on the tiling:
Luckily the spot where we wanted a recessed medicine cabinet was already framed for it, so the installation of that went really smoothly.
The grout is finished and the plumbing is all in place.
Now for the after pictures:

If I had it to do over again I wouldn't choose this tile, but at least it's a nice, new bathroom!
A real shower head!!
And a lovely wall register! Yea!

July 28, 2004

Front Door

We get asked about our front door and storm door pretty often. When we were trying to decide on doors we drove around our neighborhood taking pictures and really liked one of our neighbor's doors. We took the picture to Edward Hines Lumber, and they were super helpful looking through books with us to find similar door styles.

We ended up buying our front door from Simpson Door Company: And our storm door from The Combination Door Company. It has a glass front for winter and a screen front that we use the rest of the year.

We ordered both of them through Edward Hines. They came unfinished, and we stained and sealed them. We were on a really tight budget for our siding, windows, and roof so we could do them all at one time, but this splurge on the doors was totally worth it - it really makes all the difference in the look of the entire house.

July 12, 2004

Exterior Remodeling

The first step was to remove the old porch and concrete steps:
Next were the support posts and porch structure.
Porch flooring:
This was a crazy day - we were getting lots of deliveries and almost every crew was here except the roofing guys.A before picture of the siding:

The new siding in progress:
It's coming together nicely! We still need a new front door, gutters, trim on the porch posts,and paint for the porch.
Prairie Path Pavers really helped us out with this last minute decision to put in a new sidewalk from the porch to the driveway. We were also thrilled with the choices that O'Donovan Landscaping helped us with, a few small evergreens and two burning bushes.
From start to finish the entire job only took about 2 months! At the time it seemed like forever, but looking back that's really not too bad.

May 20, 2004

Exterior Color Selections

When we first bought our house in 2000 it had some boxy, overgrown evergreen bushes in front of the porch. We removed them and planted a tree in the front yard, but other than that, this is pretty much what the house looked like:

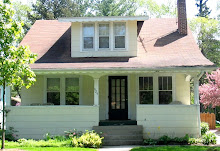
In 2004 we decided to replace the porch, siding, roof, and windows. The first step was making lots and lots of decisions. We drove around taking pictures of houses we liked. We really liked this house's color scheme:

We liked this siding:

And this roof:

Next I created images of what our house would look like. Here's my drawing of our house's original color scheme:
This is one of the color schemes we were considering; the siding color was "Montery Sand".

This drawing is closest to all of the colors we finally decided on:
Roof: Weathered Wood, architectural style (Timberline)
Siding: Tuscan Clay (Charter Oak)
Trim: Natural Linen (Charter Oak)
Porch floor, steps, and railings: Oak Brown, semi-transparent (Cabot)
Porch posts, spindles, lattice, and trim around lattice: Ultra White, solid (Cabot)

May 16, 2004

Porch

When our house was originally built in 1927 the front porch had no support posts at all - it was just built right on the ground. When we bought the house in 2000 the porch was sagging in several places, and we had to block off two of the corners that weren't safe to stand on.

When we decided to replace the porch as part of our exterior remodeling, we ran into a few problems with the city zoning board, so our contractor had these detailed drawings made up for us to use in our variance request and, of course, for the carpenter.


Fortunately all it took was one call to a helpful city councilman to get the zoning issues resolved, and our carpenter was really talented and did a great job!