May 26, 2006

Downstairs Bathroom

When we remodeled the exterior of our house we asked the siding guys to remove the downstairs bathroom window which was in the shower area. At the time we thought we would eventually re-tile that area ourselves. Two years passed, and that never happened, so we called our contractor and asked him for an estimate.

He came over to take a look at the bathroom, and as we were talking about it, we decided to have him remove the old cast iron bathtub as well. And as long as we were doing that, we might as well also re-tile the floor. And install a recessed medicine cabinet. And a fan. And update the electrical. And replace the baseboard and heating vent.

It's really hard to take good pictures of this tiny bathroom, so here's a drawing to give you an overall idea of the layout:
Now for the "before" pictures. I really hate to admit this, but we actually put up this wallpaper and border (!) ourselves in 2000.
I hated this heating register!
And this white tile floor:
Here's a picture of where the window used to be. Oh yeah, and notice there wasn't a real shower head, just a hose going from the bathtub faucet up to a handheld shower head. Lovely.
After removing the old tile and the bathtub, they ended up taking down almost all of the walls to the studs.
Then they put in lots of insulation on the exterior wall where the bathtub is so our bathwater won't get cold so quickly in the winter.
Once the bathtub was in and the new drywall was installed, they started on the tiling:
Luckily the spot where we wanted a recessed medicine cabinet was already framed for it, so the installation of that went really smoothly.
The grout is finished and the plumbing is all in place.
Now for the after pictures:

If I had it to do over again I wouldn't choose this tile, but at least it's a nice, new bathroom!
A real shower head!!
And a lovely wall register! Yea!

July 28, 2004

Front Door

We get asked about our front door and storm door pretty often. When we were trying to decide on doors we drove around our neighborhood taking pictures and really liked one of our neighbor's doors. We took the picture to Edward Hines Lumber, and they were super helpful looking through books with us to find similar door styles.

We ended up buying our front door from Simpson Door Company: And our storm door from The Combination Door Company. It has a glass front for winter and a screen front that we use the rest of the year.

We ordered both of them through Edward Hines. They came unfinished, and we stained and sealed them. We were on a really tight budget for our siding, windows, and roof so we could do them all at one time, but this splurge on the doors was totally worth it - it really makes all the difference in the look of the entire house.

July 12, 2004

Exterior Remodeling

The first step was to remove the old porch and concrete steps:
Next were the support posts and porch structure.
Porch flooring:
This was a crazy day - we were getting lots of deliveries and almost every crew was here except the roofing guys.A before picture of the siding:

The new siding in progress:
It's coming together nicely! We still need a new front door, gutters, trim on the porch posts,and paint for the porch.
Prairie Path Pavers really helped us out with this last minute decision to put in a new sidewalk from the porch to the driveway. We were also thrilled with the choices that O'Donovan Landscaping helped us with, a few small evergreens and two burning bushes.
From start to finish the entire job only took about 2 months! At the time it seemed like forever, but looking back that's really not too bad.

May 20, 2004

Exterior Color Selections

When we first bought our house in 2000 it had some boxy, overgrown evergreen bushes in front of the porch. We removed them and planted a tree in the front yard, but other than that, this is pretty much what the house looked like:

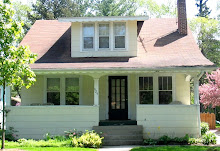
In 2004 we decided to replace the porch, siding, roof, and windows. The first step was making lots and lots of decisions. We drove around taking pictures of houses we liked. We really liked this house's color scheme:

We liked this siding:

And this roof:

Next I created images of what our house would look like. Here's my drawing of our house's original color scheme:
This is one of the color schemes we were considering; the siding color was "Montery Sand".

This drawing is closest to all of the colors we finally decided on:
Roof: Weathered Wood, architectural style (Timberline)
Siding: Tuscan Clay (Charter Oak)
Trim: Natural Linen (Charter Oak)
Porch floor, steps, and railings: Oak Brown, semi-transparent (Cabot)
Porch posts, spindles, lattice, and trim around lattice: Ultra White, solid (Cabot)

May 16, 2004

Porch

When our house was originally built in 1927 the front porch had no support posts at all - it was just built right on the ground. When we bought the house in 2000 the porch was sagging in several places, and we had to block off two of the corners that weren't safe to stand on.

When we decided to replace the porch as part of our exterior remodeling, we ran into a few problems with the city zoning board, so our contractor had these detailed drawings made up for us to use in our variance request and, of course, for the carpenter.


Fortunately all it took was one call to a helpful city councilman to get the zoning issues resolved, and our carpenter was really talented and did a great job!

May 15, 2004

Shed

Not having a garage that we could store anything in for 4 years we'd been keeping all our yard stuff in the basement and hauling our old fashioned reel mower up and down the stairs every time we cut the grass.

Not knowing when we'd ever build a new garage we finally decided to buy a shed kit from Home Depot. Here's a picture of the materials from the kit. The shed's going to go in the very back of the yard in the left corner.
If my memory serves me correctly, this project wasn't too bad. Or maybe it was just nice that my mom came to babysit almost all weekend, and working on this project was a nice break for me. And I love projects with such an immediate and tangible result!

My sister and I ended up putting the roof on the shed while my husband was at work one day, and it felt like such an awesome accomplishment! I'm really happy with how it turned out, and the storage space is great. My husband is thrilled that we were finally able to get a gas-powered lawnmower!

May 25, 2003

Patio

The next project that I felt was necessary since I was going to be a stay-at-home-mom was a patio. I figured we'd be spending a lot of time in the backyard, and we currently had nothing but a concrete sidewalk from the back door to the driveway.
This was another one of those projects that we considered doing ourselves, but then decided that it would take way too long to learn what to do and work on it in our free time. So we drew up a diagram of what we wanted and hired Prairie Path Pavers. It only took them one day to do the entire thing, and we were thrilled with the results. Definitely worth every penny!

May 15, 2003

French Doors

Our house was originally a four-room house - a living room, kitchen, and two bedrooms (well, 5 if you count the bathroom). The two front rooms had a long wall dividing them to the left when you walk in the front door:This made sense in 1927, but at some point in time the upstairs was expanded to make room for 3 bedrooms and a bathroom. So the downstairs front "bedroom" no longer needed to be such a private space.

When we first saw this house one of the first things we thought of that we would want to do was to put in french doors to open the two front rooms up to each other. When I was expecting our first child and planning to be a stay-at-home mom, we decided that it was absolutely necessary to make the downstairs layout more functional.

We asked a few contractors for quotes. Two of them were outrageously expensive, and the third told us it couldn't be done. Fortunately an engineer friend of ours who has quite a bit of experience in carpentry and home improvement convinced us we could do it ourselves (well, really my husband could do it because I was 8 months pregnant at this point). Our friend drew up detailed plans for us, and we dove in.

This project was a huge mess (all of our walls downstairs are plaster), and because we could only work on weekends, it took almost a month from beginning to end.

It was so exciting when we finally broke through the wall and could see sunlight from the other side!

We ran into one major problem with the heating ducts going through the wall from the basement to the nursery upstairs. Not only did we end up having to tear up the nursery floor (about 3 weeks before my due date!), but finding the right size duct work and connections was also a huge problem. Miraculously, a few employees at Home Depot ended up helping us figure out a configuration that would work so we didn't need to special order anything.

Getting the headers in snugly for support and getting the doors aligned correctly also proved to be a major struggle, but my husband ended up doing the entire project himself with only a few phone calls to our friend.

I was absolutely thrilled with how it turned out! My husband is always noticing the small flaws and telling people this is what it looks like when a banker tries doing home improvement himself, but I love it, and we get lots of compliments on it. It made the layout of our house so much better!

July 9, 2002

Fence

Once the garage was removed we had a cedar fence installed in our backyard. Next we spent several hours cleaning up bits of asphalt and concrete to get the area where the garage used to be ready to plant grass. We decided to try grass seed instead of sod to see what would happen, and it grew in beautifully!